Navigation
Install the app
How to install the app on iOS
Follow along with the video below to see how to install our site as a web app on your home screen.
Note: This feature may not be available in some browsers.
More options
You are using an out of date browser. It may not display this or other websites correctly.
You should upgrade or use an alternative browser.
You should upgrade or use an alternative browser.
[SOLVED] WS2016 DISM error 1734 the array bounds are invalid.
- Thread starter arcanduc
- Start date
Hi and welcome to Sysnative,
Follow these instructions to remove an update.
Follow these instructions to remove an update.
- Open the Start menu of Windows and type the command CMD
- When you see Command Prompt on the list, right-click on it and select Run as administrator.
- When command prompt opens, copy and paste the following command into it, then press enter.
Code:
wusa /uninstall /KB:4489889- Let me know if it says it was successful or you get the message: The update KB4489889 is not installed on this computer.
Hi,
Follow these instructions to remove an update.
Follow these instructions to remove an update.
- Open the Start menu of Windows and type the command CMD
- When you see Command Prompt on the list, right-click on it and select Run as administrator.
- When command prompt opens, copy and paste the following command into it, then press enter.
Code:
wusa /uninstall /KB:4489889- Let me know if it says it was successful or you get the message: The update KB4489889 is not installed on this computer.
Download the
 Farbar Recovery Scan Tool and save it to your Desktop:
Download the 64 bit version: - Farbar Recovery Scan Tool Link
Right-click on the file FRST64.exe and choose Run as administrator.
Download the 64 bit version: - Farbar Recovery Scan Tool Link
- Open the startmenu and type the command cmd.
- After you find the Command Prompt, right click on it and select Run as Administrator.
- Copy and paste the following into the Command Prompt and press enter.
Code:
reg load HKLM\COMPONENTS C:\WINDOWS\SYSTEM32\CONFIG\COMPONENTS- Copy and paste the following (code) into the Search box and click the Search Registry button.
Code:
KB4489889- When the scan is complete, a message will display that SearchReg.txt is saved in the same folder FRST was started from.
- Post the logfile SearchReg.txt as attachment in your next reply.
Hi,
Start the
 Farbar Recovery Scan Tool again.
Warning: This script was written specifically for this system. Do not run this script on another system.
Start the
Warning: This script was written specifically for this system. Do not run this script on another system.
- Download the attachment fixlist.txt and save it to your desktop.
- Right-click on FRST.exe and select "Run as administrator".
- Press the Fix button.
- If for some reason the tool needs a restart, please make sure you let the system restart normally.
- When finished, a log called Fixlog.txt will appear in the same directory the tool is run from.
- Post the logfile Fixlog.txt as attachment in your next reply.
Attachments
Please run the following DISM command and post the result. If it fails attach a new copy of the CBS log.
Code:
DISM /online /cleanup-image /RestoreHealthHi,
Step 1. Download
 SFCFix and save it to your desktop.
Warning: This fix was written specifically for this system. Do not run this fix on another system.

Step 2. Run the following DISM command and post the result. If it fails attach a new copy of the CBS log.
Step 1. Download
Warning: This fix was written specifically for this system. Do not run this fix on another system.
- Save any work you have open, and close all programs.
- Download the attachment SFCFix.zip and save it to your desktop.
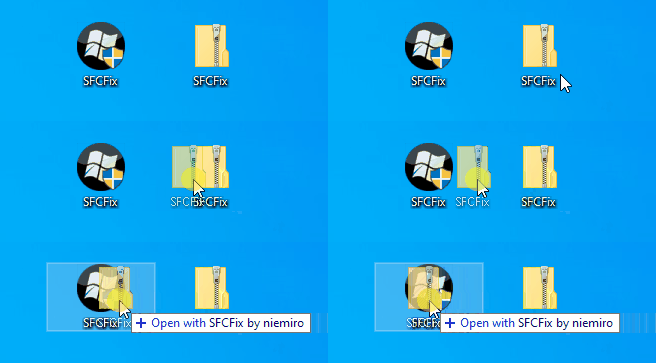
- Drag the SFCFix.zip file over the SFCFix.exe executable and release it.

- SFCFix will launch, let it complete.
- Once done, a file will appear on your desktop, called SFCFix.txt.
- Post the logfile (SFCFix.txt) as attachment in your next reply.
Step 2. Run the following DISM command and post the result. If it fails attach a new copy of the CBS log.
Code:
DISM /online /cleanup-image /RestoreHealthAttachments
Hi,
Great, please attempt to update build (14393.6981) and post the result, if it fails attach a new copy of the CBS logs.
Great, please attempt to update build (14393.6981) and post the result, if it fails attach a new copy of the CBS logs.
Hi,
Upload your COMPONENTS hive.
Export CBS (Component Based Servicing) hive
Upload your COMPONENTS hive.
- Navigate to C:\Windows\System32\Config and locate the COMPONENTS file.
- Please copy this file to your desktop.
- Note: If you receive an error that this file is in-use, simply reboot your computer and try again.
- Right-click on this file on your desktop and select Send To > Compressed (zipped) folder. This will create a file named COMPONENTS.ZIP on your desktop.
- If the file is too large to upload here, upload the file to www.wetransfer.com and post the link in your next reply.
Export CBS (Component Based Servicing) hive
- Click on the Start button and type regedit
- When you see regedit on the list, right-click on it and select Run as administrator.
- When regedit opens, using the left pane, navigate to the following registry key and select it by clicking on it once.
Code:HKEY_LOCAL_MACHINE\SOFTWARE\Microsoft\Windows\CurrentVersion\Component Based Servicing - Once selected, click File > Export....
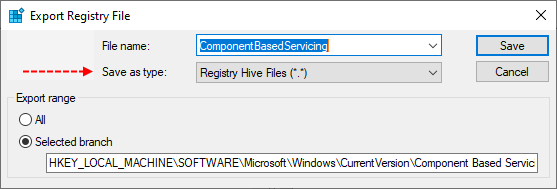
- Change the Save as type: to Registry Hive Files (*.*).

- Name this file ComponentBasedServicing (with no file extension) and save it to your Desktop.
- Right-click on the saved file and choose Send > Compressed (zipped) Folder.
- Attach the .ZIP file to your next post.
- If the file is too large to upload here, upload the file to www.wetransfer.com and post the link in your next reply.
Hi,
Step 1.
Warning: This fix was written specifically for this system. Do not run this fix on another system.

Step 2. Reboot the server and download
 ComponentsScanner and save it to your desktop.
Step 1.
Warning: This fix was written specifically for this system. Do not run this fix on another system.
- Save any work you have open, and close all programs.
- Download the attachment SFCFixScript.txt and save it to your desktop.
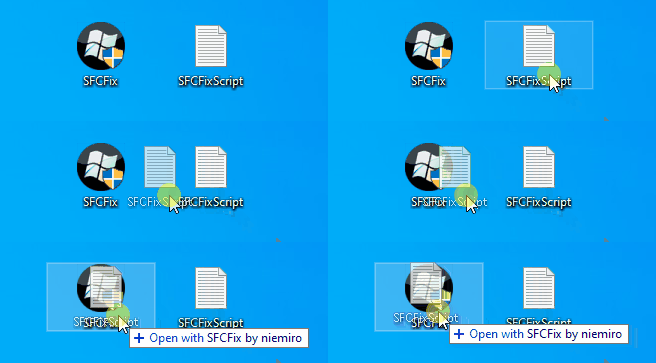
- Drag the SFCFixScript.txt file over the SFCFix.exe executable and release it.

- SFCFix will launch, let it complete.
- Once done, a file will appear on your desktop, called SFCFix.txt.
- Post the logfile (SFCFix.txt) as attachment in your next reply.
Step 2. Reboot the server and download
- Right-click ComponentsScanner.exe and select "Run as administrator", click Yes on the UAC (User Account Control) prompt which appears.
- Follow the on-screen instructions.
- Once complete, a report will be saved to your desktop called ComponentsScanner.txt.
- Post the logfile ComponentsScanner.txt as attachment into your next reply.
Attachments
Hi,
Here's the next fix.
Step 1.
Warning: This fix was written specifically for this system. Do not run this fix on another system.

Step 2. Reboot the server and download
 ComponentsScanner and save it to your desktop.
Here's the next fix.
Step 1.
Warning: This fix was written specifically for this system. Do not run this fix on another system.
- Save any work you have open, and close all programs.
- Download the attachment SFCFixScript.txt and save it to your desktop.
- Drag the SFCFixScript.txt file over the SFCFix.exe executable and release it.

- SFCFix will launch, let it complete.
- Once done, a file will appear on your desktop, called SFCFix.txt.
- Post the logfile (SFCFix.txt) as attachment in your next reply.
Step 2. Reboot the server and download
- Right-click ComponentsScanner.exe and select "Run as administrator", click Yes on the UAC (User Account Control) prompt which appears.
- Follow the on-screen instructions.
- Once complete, a report will be saved to your desktop called ComponentsScanner.txt.
- Post the logfile ComponentsScanner.txt as attachment into your next reply.
Attachments
Has Sysnative Forums helped you? Please consider donating to help us support the site!


