[SOLVED] WIndows Update error 0x80071a91

brandom

Member
Joined
Oct 18, 2024
Posts
16
Hello everyone,
I decided to solve problem with error in windows update, started digging and found out that sfc /scannow fails, dism command too, cannot install .Net Framework 4.8.1 etc.
NetFxRepairTool.exe didn't help. SFCFix.exe tool failed too.
This is domain controller with lots of everything, so I really want to fix this VM. This servers was upgraded from 2016 or 2019 Server (don't remember) a year ago, maybe from that time there is an issue with updates, ut I'm not sure.
Thanks in advance.

Config:
OS Name: Microsoft Windows Server 2022 Datacenter
OS Version: 10.0.20348 N/A Build 20348

SFC error:
Beginning verification phase of system scan.
Verification 100% complete.
Windows Resource Protection found corrupt files but was unable to fix some of them.

DISM error:
Error: 0x800f081f
The source files could not be found.
Use the "Source" option to specify the location of the files that are required to restore the feature.
 

Attachments

Hi and welcome to Sysnative,

I've just loaded an Server 2022 image, but note I'm limited to provide help with Windows Server 2022 because all my VM are offline at the moment due to some migration to another environment.

Step 1. Download
67139f7e69a58-SFCFix-ico.PNG
SFCFix and save it to your desktop.

Warning: This fix was written specifically for this system. Do not run this fix on another system.
  • Save any work you have open, and close all programs.
  • Download the attachment SFCFix.zip and save it to your desktop.
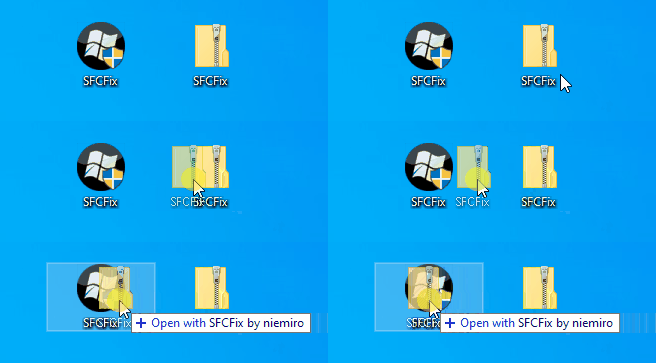
  • Drag the SFCFix.zip file over the SFCFix.exe executable and release it.
67139f52b3c1e-SFCFix-Zip-Eng.gif

  • SFCFix will launch, let it complete.
  • Once done, a file will appear on your desktop, called SFCFix.txt.
  • Post the logfile (SFCFix.txt) as attachment in your next reply.


Step 2. Run the following DISM command and post the result. If it fails attach a new copy of the CBS log.
Code:
DISM /online /cleanup-image /RestoreHealth
 

Attachments

Hello Maxstar,
SFCFix worked almost perfect, DISM failed.
Error: 6801
Then I rebooted the server, mounted ISO with Server 2022 and ran dism with limitaccess paramenter and it worked fine.
svc /scannow says everything is fine now.
But I still cannot install .net framework 4.8.1 or install/remove any feature on this server.
.Net installtion, windows updates and feature installations fails with 0x80071a91
1729957633745.webp
NetFxRepairTool.exe cannot fix the issue.
If I start SFCFix.exe alone, It crashes.
Don't know if you can help me with this.

P.S. Added dism_latest.log, .net log after all my manipulations.
Also doesn't work refresh in Server Manager. Doesn't show all roles.

1729957916516.webp
 

Attachments

Last edited:
NetFxRepairTool.exe cannot fix the issue.
Please run the tool again and provide the log files as well as the latest CBS logs.

Download the
60fe7f9d70500-NetFxRepairTool_107-1.png
Microsoft .NET Framework Repair tool and save it to your Desktop.
  • Right-click on NetFxRepairTool.exe and select Run as Administrator.
  • Agree with the license terms "I have read and accept the license terms" and click Next.
  • After checking, the tool will indicate which problems need to be fixed.
  • Click on Next to continue, when this process is finished click Next.
  • The tool will now collect the log files... > when completed the following file is created: FixDotNet****.cab.
  • Click on Finish to close the tool.
  • Right-click on the file FixDotNet****.cab and choose Send to > Compressed (zipped) folder.
  • Attach the ZIP file in your next reply.
 
Export CBS (Component Based Servicing) hive
  • Click on the Start button and type regedit
  • When you see regedit on the list, right-click on it and select Run as administrator.
  • When regedit opens, using the left pane, navigate to the following registry key and select it by clicking on it once.
    Code:
    HKEY_LOCAL_MACHINE\SOFTWARE\Microsoft\Windows\CurrentVersion\Component Based Servicing
  • Once selected, click File > Export....
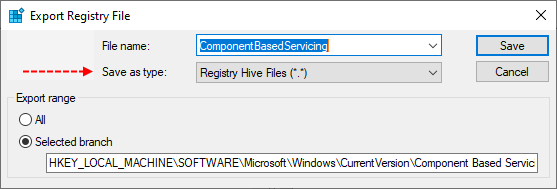
  • Change the Save as type: to Registry Hive Files (*.*).

    622dbef75cd3a-Export-CBS-hive.png

  • Name this file ComponentBasedServicing (with no file extension) and save it to your Desktop.
  • Right-click on the saved file and choose Send > Compressed (zipped) Folder.
  • Attach the .ZIP file to your next post.
  • If the file is too large to upload here, upload the file to www.wetransfer.com and post the link in your next reply.
 
Download the
577bf0efb8088-FRST.png
Farbar Recovery Scan Tool and save it to your Desktop:

Download the 64 bit version: - Farbar Recovery Scan Tool Link

Warning: This script was written specifically for this system. Do not run this script on another system.

  • Download the attachment fixlist.txt and save it to your desktop.
  • Right-click on FRST.exe and select "Run as administrator".
  • Press the Fix button.
  • If for some reason the tool needs a restart, please make sure you let the system restart normally.
  • When finished, a log called Fixlog.txt will appear in the same directory the tool is run from.
  • Post the logfile Fixlog.txt as attachment in your next reply.

After the reboot attempt to update and post the result. If it fails attach a new copy of the CBS logs.
 

Attachments

Rich (BB code):
2024-10-26 20:02:03, Error                 CSI    00000013 (F) STATUS_RM_NOT_ACTIVE #1406027# from Windows::Rtl::SystemImplementation::DirectRegistryProvider::SysCreateKey(key = {provider=NULL, handle=0, name= ("null")}, da = (KEY_READ|KEY_SET_VALUE|KEY_CREATE_SUB_KEY|KEY_WOW64_64KEY), oa = @0x854997dcc8->OBJECT_ATTRIBUTES {s:48; rd:NULL; on:[112]'\Registry\Machine\COMPONENTS\DerivedData\Components\amd64_jsc_b03f5f7f11d50a3a_4.0.15840.3_none_02d48640c2a52471'; a:(OBJ_CASE_INSENSITIVE)}, ti = 0, class = '(null)', co = (REG_OPTION_BACKUP_RESTORE), disp = Un[gle=0xd0190005]
2024-10-26 20:02:03, Error                 CSI    mapped disposition: 0)
[gle=0xd0190005]

Upload your COMPONENTS hive.
  • Navigate to C:\Windows\System32\Config and locate the COMPONENTS file.
  • Please copy this file to your desktop.
  • Note: If you receive an error that this file is in-use, simply reboot your computer and try again.
  • Right-click on this file on your desktop and select Send To > Compressed (zipped) folder. This will create a file named COMPONENTS.ZIP on your desktop.
  • If the file is too large to upload here, upload the file to www.wetransfer.com and post the link in your next reply.
 
Hi,

Download the
577bf0efb8088-FRST.png
Farbar Recovery Scan Tool and save it to your Desktop:

Download the 64 bit version: - Farbar Recovery Scan Tool Link

Warning: This script was written specifically for this system. Do not run this script on another system.

  • Download the attachment fixlist.txt and save it to your desktop.
  • Right-click on FRST.exe and select "Run as administrator".
  • Press the Fix button.
  • If for some reason the tool needs a restart, please make sure you let the system restart normally.
  • When finished, a log called Fixlog.txt will appear in the same directory the tool is run from.
  • Post the logfile Fixlog.txt as attachment in your next reply.

After the reboot attempt to update and post the result. If it fails attach a new copy of the CBS logs.
 

Attachments

Please do the following to get some more info about the Servicing Stack.

Start the
577bf0efb8088-FRST.png
Farbar Recovery Scan Tool again.
  • Download the attachment fixlist.txt and save it to your desktop.
  • Right-click on FRST.exe and select "Run as administrator".
  • Press the Fix button.
  • If for some reason the tool needs a restart, please make sure you let the system restart normally.
  • When finished, a log called Fixlog.txt will appear in the same directory the tool is run from.
  • Post the logfile Fixlog.txt as attachment in your next reply.
 

Attachments

Open an elevated prompt and run the following commands and post the result.
Code:
fsutil resource setautoreset true %SystemDrive%\
attrib -r -s -h %SystemRoot%\System32\Config\TxR\*
del %SystemRoot%\System32\Config\TxR\*
attrib -r -s -h %SystemRoot%\System32\SMI\Store\Machine\*
del %SystemRoot%\System32\SMI\Store\Machine\*.tm*
del %SystemRoot%\System32\SMI\Store\Machine\*.blf
del %SystemRoot%\System32\SMI\Store\Machine\*.regtrans-ms
 
Microsoft Windows [Version 10.0.20348.587]
(c) Microsoft Corporation. All rights reserved.

C:\windows\system32>fsutil resource setautoreset true %SystemDrive%\
The operation completed successfully.

C:\windows\system32>attrib -r -s -h %SystemRoot%\System32\Config\TxR\*

C:\windows\system32>del %SystemRoot%\System32\Config\TxR\*
C:\windows\System32\Config\TxR\*, Are you sure (Y/N)? y

C:\windows\system32>
 

Has Sysnative Forums helped you? Please consider donating to help us support the site!

Back
Top