[SOLVED] Windows Server 2019 - Update Fail 0x80070003 since months

AAIC - David Lorenz

Contributor
Joined
Mar 23, 2023
Posts
80
Dear forum members,

my name is david lorenz from aaic soft systems gmbh in leipzig (germany). You already know me from the following post:

[SOLVED] - Windows Server 2019 Standard with Exchange 2019 - Update Fail 0x80073712

We have had problems with two customer VMs with the Windows Server 2019 Standard operating system for a long time. Exchange Server 2019 is running on one system and Acronis Backup on the other. Exchange and .net updates are running smoothly. However, the system no longer installs cumulative Windows updates.

The error is 0x80070003. I have already read in and put the "SFCFix.exe" file on the desktop. I've also attached the logs and component file on we transfer "COMPONENTS.zip". It's all about the Exchange server. I make a new entry for the other server.

I have documented the errors with the following time stamps:

SONSRVEXC: Install 12:00
Restart 13:33
Error 13:36:40 (reboot)
Undo 13:38:24 (reboot again)
Error: 0x80070003

We have already tried the following:
- Allow the software distribution folder to be recreated
- DISM and Chkdsk
- Manual update installation (msp)
- Installation of the last service stack update (successful)
- Event viewer control

Maybe one of you can help us here. Unfortunately I cannot understand the logs.

Thank you in advance and have a pleasant rest of the week!
 

Attachments

Hi,

  • Open Windows Explorer and browse to the C:\Windows\INF folder.
  • Right-click on the file setupapi.dev.log and choose Send to > Compressed (zipped) folder.
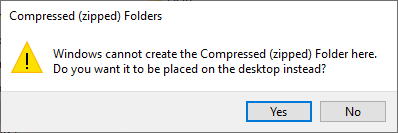
  • Now the message will appear, "Windows cannot create the Compressed (zipped) Folder here. Do you want it to be placed on the desktop instead?"
  • Click on the Yes button here.
618e949e09fef-CBS-Folder.png

  • Attach the file setupapi.dev.zip in your next reply.
 
Hi,

Export registry key as hive file.
  • Open the Start menu of Windows and type CMD.
  • When you see Command Prompt on the list, select the option Run as administrator.
  • Copy and paste the following commands one at a time into the command prompt and press enter after each.
Code:
reg save "HKLM\SYSTEM\DriverDatabase\DriverPackages" "%userprofile%\Desktop\DriverPackages.hiv"
  • Once done, a file will appear on your desktop, called DriverPackages.hiv.
  • ZIP this file and attach it to your next reply.


Upload your DRIVERS Hive
  • Navigate to C:\Windows\System32\config and locate the DRIVERS file.
  • Please copy this file to your desktop.
  • Note: If you receive an error that this file is in-use, simply reboot your computer and try again.
  • Right-click on this file on your desktop and select Send To > Compressed (zipped) folder. This will create a file named DRIVERS.ZIP on your desktop.
  • If the file is too large to upload here, upload the file to www.wetransfer.com and post the link in your next reply.
 
Open an elevated command prompt and run the following command. Attach Dirlist.txt to your next post.
Code:
dir /s /a %systemroot%\WinSxS\amd64_dual_usbaudio2.inf_31bf3856ad364e35_10.0.17763.592_none_d128a5b61462af61 > "%userprofile%\Desktop\Dirlist.txt"
 
Download
56f31e53c97da-SFCFix.PNG
SFCFix and save it to your desktop.
  • Save any work you have open, and close all programs.
  • Download the attachment SFCFixScript.txt and save it to your desktop.
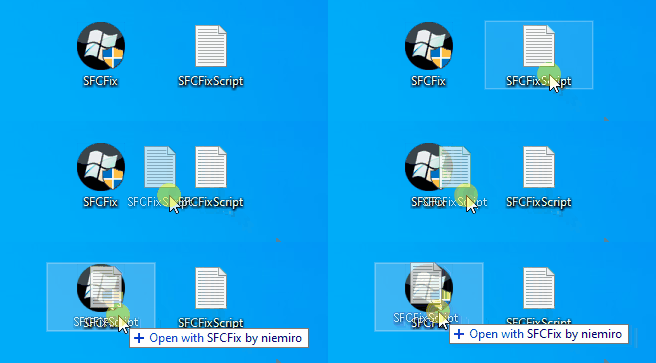
  • Drag the SFCFixScript.txt file over the SFCFix.exe executable and release it.
62151e1bebac4-SFCFix-Txt-Eng.gif

  • SFCFix will launch, let it complete.
  • Once done, a file will appear on your desktop, called SFCFix.txt.
  • Post the logfile (SFCFix.txt) as attachment in your next reply.
 

Attachments

Open an elevated command prompt and run the following command. Attach Dirlist.txt to your next post.
Code:
dir /s /a C:\Windows\System32\DriverStore\FileRepository\ntprint.inf_amd64_2097e02ea77b432e > "%userprofile%\Desktop\Dirlist.txt"
 
Warning: This fix was written specifically for this system. Do not run this fix on another system.
  • Save any work you have open, and close all programs.
  • Download the attachment SFCFixScript.txt and save it to your desktop.
  • Drag the SFCFixScript.txt file over the SFCFix.exe executable and release it.
62151e1bebac4-SFCFix-Txt-Eng.gif

  • SFCFix will launch, let it complete.
  • Once done, a file will appear on your desktop, called SFCFix.txt.
  • Post the logfile (SFCFix.txt) as attachment in your next reply.
 

Attachments

The script failed because I made a mistake in the path variable.

Warning: This fix was written specifically for this system. Do not run this fix on another system.
  • Save any work you have open, and close all programs.
  • Download the attachment SFCFixScript.txt and save it to your desktop.
  • Drag the SFCFixScript.txt file over the SFCFix.exe executable and release it.
62151e1bebac4-SFCFix-Txt-Eng.gif

  • SFCFix will launch, let it complete.
  • Once done, a file will appear on your desktop, called SFCFix.txt.
  • Post the logfile (SFCFix.txt) as attachment in your next reply.
 

Attachments

This looks better, please reboot the server and attempt to update. If it fails attach a new copy of the CBS log and setupapi.dev.log.
 
I will test it. The .Net (2023-02) fails with 0x80073701. The Comulative (2023-03) trys to install. It installs at 3%. I will send you a update the next minutes. Maybe with the logs.
 
Hello @Maxstar ,

now the commulative updates installation works. Thank you for that! But the .Net Updates doesent work like before.

There are the timings:

-> .Net 0x80073701 (11:44)
-> Wind (restart 12:00 & works)
-> again .Net = fail 12:07
 

Attachments

Please do the following to fix the .NET issue.

Follow these instructions to install an update with DISM.
  • Open the Start menu of Windows and type CMD.
  • When you see Command Prompt on the list, select the option Run as administrator.
  • Copy and paste the following command into it, and press enter. (Leave the CMD window open!)
Code:
MD C:\WUTemp
  • Now, download the following update (KB5017263) to: C:\WUTemp - Or copy this file from the download directory to C:\WUTemp. (Important!)
    Downloadlink: KB5017263
  • Copy and paste the following commands one at a time into the command prompt and press enter after each.
Code:
CD C:\WUTemp
EXPAND.exe windows10.0-kb5017263-x64-ndp48_bbc9586178ba2f66be2a58ef7c6b4d2362b7bdfe.msu -f:* C:\WUTemp
DISM.exe /Online /Add-Package /PackagePath:C:\WUtemp\Windows10.0-KB5017263-x64-NDP48.cab
  • Let me know if it says it was successful or if there are any errors. Or take a screenshot of the command prompt window and paste it into your next reply.
 

Has Sysnative Forums helped you? Please consider donating to help us support the site!

Back
Top