[SOLVED] Windows Server 2019 Rollsback All Updates - Error 0x800703f1

stevenTPG

Member
Joined
Feb 13, 2024
Posts
21
Hello,

I am working with a Hyper-V VM running Windows Server 2019. When Windows Update is run, updates install and require a reboot. I reboot the system and the updates are all uninstalled. Upon login, I get an error saying that the updates could not be installed with error code 0x800703f1.

I've done some troubleshooting briefly described in this MS Question: Windows Server 2019 Can't Perform Windows Update - Microsoft Q&A

I want to avoid having to rebuild this system and get it patched. The previous system admin didn't believe in patching, and seldom updated servers. This may be a lost cause, but I'm hoping y'all can help.

Attached are the ComponentsScanner.txt and the zipped CBS folder.

All the best,
Steven
 

Attachments

Hi and welcome to Sysnative,

Upload your DRIVERS Hive
  • Navigate to C:\Windows\System32\config and locate the DRIVERS file.
  • Please copy this file to your desktop.
  • Note: If you receive an error that this file is in-use, simply reboot your computer and try again.
  • Right-click on this file on your desktop and select Send To > Compressed (zipped) folder. This will create a file named DRIVERS.ZIP on your desktop.
  • If the file is too large to upload here, upload the file to www.wetransfer.com and post the link in your next reply.
 
Replace Drivers Hive Manually

Warning: this fix is specific to the user in this thread. No one else should follow these instructions as it may cause more harm than good. If you are after assistance, please start a thread of your own.
  1. Download DRIVERS.ZIP and save to your desktop.
  2. Right-click on it and select Extract all.... Make sure the "Show extracted files when complete" is checked and click Extract.
  3. Now we have the DRIVERS file that we will be using to replace your current one.
  4. Navigate to C:\Windows\System32\config
  5. Right-click on the current DRIVERS file and select rename. Rename it to DRIVERS.bad.
    Note: If you get an error that the file is in use, reboot your computer and then try again.
  6. Take the file from the Drivers folder on your desktop and paste it into C:\Windows\System32\config

Afterwards reboot the server and attempt to update. If it fails attach a new copy of the CBS logs and a copy of the Setupapi.dev.log file.

Upload the setupapi.dev.log file
  • Open Windows Explorer and browse to the C:\Windows\INF folder.
  • Right-click on the file setupapi.dev.log and choose Send to > Compressed (zipped) folder.
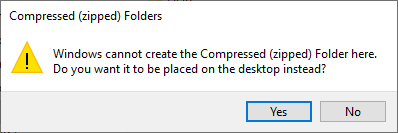
  • Now the message will appear, "Windows cannot create the Compressed (zipped) Folder here. Do you want it to be placed on the desktop instead?"
  • Click on the Yes button here.
657716925b62b-setup-api-dev-folder.png

  • Attach the file setupapi.dev.zip in your next reply.
 

Attachments

Thanks for these steps. I'll be able to attempt them during our maintenance window later this week.

To clarify- after copying the new DRIVERS file to the affected machine, do I need to reboot before attempting to update?
 
Hi,

Yes, please reboot the server after replacing the DRIVERS hive as mentioned in my previous post.
 
Thank you, will do! I've got this maintenance scheduled for early tomorrow morning (US Central Time) and will have an update then.
 
Take your time, I will see the result tomorrow, my timezone = (GMT+1)

Note: If the update fails, attach a new copy of the CBS logs as well as the following logfile.

Upload the setupapi.dev.log file
  • Open Windows Explorer and browse to the C:\Windows\INF folder.
  • Right-click on the file setupapi.dev.log and choose Send to > Compressed (zipped) folder.
  • Now the message will appear, "Windows cannot create the Compressed (zipped) Folder here. Do you want it to be placed on the desktop instead?"
  • Click on the Yes button here.
657716925b62b-setup-api-dev-folder.png

  • Attach the file setupapi.dev.zip in your next reply.
 
Hi,

Step 1. Download
6530fbb0f4101-56f31e53c97da-SFCFix.PNG
SFCFix and save it to your desktop.

Warning: This fix was written specifically for this system. Do not run this fix on another system.
  • Save any work you have open, and close all programs.
  • Download the attachment SFCFix.zip and save it to your desktop.
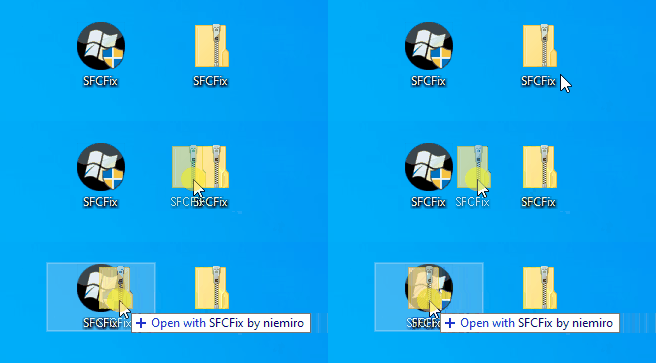
  • Drag the SFCFix.zip file over the SFCFix.exe executable and release it.
650c22f99662d-6190d993a26f3-SFCFix-Zip-Eng.gif

  • SFCFix will launch, let it complete.
  • Once done, a file will appear on your desktop, called SFCFix.txt.
  • Post the logfile (SFCFix.txt) as attachment in your next reply.


Step 2. Run the System File Checker and post the result. If it fails attach a new copy of the CBS log.
Code:
SFC /Scannow
 

Attachments

Hey Maxstar,

Here is the sfc /scannow output:

C:\Windows\system32>sfc /scannow

Beginning system scan. This process will take some time.

Beginning verification phase of system scan.
Verification 100% complete.

Windows Resource Protection did not find any integrity violations.

---
SFC did not fail, so I haven't uploaded a new CBS log.

Attached is the SFCFix.txt

All the best,
Steven
 

Attachments

Hi,

Great, please attempt to update. If it fails attach a new copy of the CBS logs as well as a copy of the Setupapi.dev.log.
 
Hey Maxstar,

Updates went through and did not rollback on reboot! Thank you so much for all your help!

All the best,
Steven
 
Hi,

You're welcome. Glad to hear this server is up-to-date now...(y)
I will mark this thread as solved.
 

Has Sysnative Forums helped you? Please consider donating to help us support the site!

Back
Top