[SOLVED] Windows Server 2019 cumulative update fail

KhaledSalem

Member
Joined
Nov 20, 2023
Posts
17
Hello team,
thanks for awesome work you are doing,
I've an issue with couple of windows server 2019 VMs, which keep failing on windows cumulative updates.
tried everything scanfc and dism online repair, but still
 

Attachments

Hi and welcome to Sysnative,

Export SBS (SideBySide) hive
  • Click on the Start button and type regedit
  • When you see regedit on the list, right-click on it and select Run as administrator.
  • When regedit opens, using the left pane, navigate to the following registry key and select it by clicking on it once.
    Code:
    HKEY_LOCAL_MACHINE\SOFTWARE\Microsoft\Windows\CurrentVersion\SideBySide
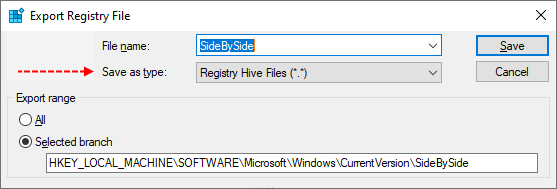
  • Once selected, click File > Export....
  • Change the Save as type: to Registry Hive Files (*.*).

    652ff1dfded79-622dbdc454cdb-Export-SBS-hive.png

  • Name this file SideBySide (with no file extension) and save it to your Desktop.
  • Right-click on the saved file and choose Send > Compressed (zipped) Folder.
  • Attach the .ZIP file to your next post.
  • If the file is too large to upload here, upload the file to www.wetransfer.com and post the link in your next reply.
 
In addition to the above, provide also the following logfile.

Upload the setupapi.dev.log file
  • Open Windows Explorer and browse to the C:\Windows\INF folder.
  • Right-click on the file setupapi.dev.log and choose Send to > Compressed (zipped) folder.
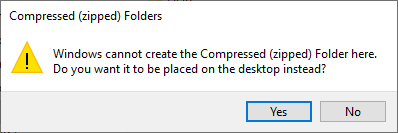
  • Now the message will appear, "Windows cannot create the Compressed (zipped) Folder here. Do you want it to be placed on the desktop instead?"
  • Click on the Yes button here.
657716925b62b-setup-api-dev-folder.png

 
Hi,

Please provide also the SideBySide hive as requested in post #4.
 
Download
6530fbb0f4101-56f31e53c97da-SFCFix.PNG
SFCFix and save it to your desktop.

Warning: This fix was written specifically for this system. Do not run this fix on another system.
  • Save any work you have open, and close all programs.
  • Download the attachment SFCFixScript.txt and save it to your desktop.
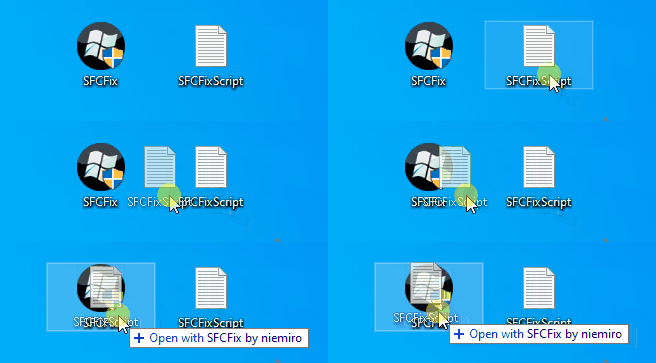
  • Drag the SFCFixScript.txt file over the SFCFix.exe executable and release it.
650ef5dbdfd06-62151e1bebac4-SFCFix-Txt-Eng.gif

  • SFCFix will launch, let it complete.
  • Once done, a file will appear on your desktop, called SFCFix.txt.
  • Post the logfile (SFCFix.txt) as attachment in your next reply.

Afterwards reboot the server and attempt to update again. If it fails attach a new copy of the CBS logs.
 

Attachments

Great, other question? How many free space is available on this server?
 
The last installed update is from March 2021, and 20GB of free space is not very much as 20/25% of free space is recommended. But let's see the result.
 
Is this an Azure VDi server? And is a Mellanox Virtual Ethernet adapter in use?
Let's check also the following:

1. Open EvenViewer > Windows Logs - take a screenshot of this window to check the size of the logs.
2. Run the following tool to check 'ghost' devices.

Download
665f1d1669e82-Ghostbuster.png
GhostBuster (Portable) to your desktop.
  • Right-click on Ghostbuster_Portable.exe and select and select "Run as administrator".
  • Maximize this window and take screenshots of the devices with the status Ghosted.
 
Please attempt to update again with Process Monitor running.

Capture Process Monitor BootLog
1. Download and run Process Monitor. Leave this running while you perform the next steps.
2. Select the Options....Enable Boot Logging option. A Enable Boot Logging dialog will come up. Just click OK.
3. Create a folder on your desktop named BootLog.
4. Attempt to install the update just like you have in the past. Let the machine reboot and revert just like it has in the past.
5. After the machine has rebooted and come back up to the desktop, open Process Monitor again. A message box will come up telling you that a log of boot-time activity was created and ask if you wish to save it. Click Yes and save to the BootLog folder on your desktop.
6. This may take some time as it converts the boot-time data. Allow it to finish.
7. Zip up the entire BootLog folder on your desktop and upload to a file sharing service like: WeTransfer - Send Large Files & Share Photos Online - Up to 2GB Free
8. Attach also a new copy of the CBS logs for the time stamps.
 
Unfortunately, the Bootlog.pml file was not closed cleanly during capture and is corrupt. Please follow the instructions below.

Capture Process Monitor BootLog from the command line
  • Download Process Monitor.
  • Create a folder on your systemdrive called "C:\Tools" and copy ProcMon.exe into this directory.
  • Open an elevated command prompt and navigate to C:\Tools with the command cd C:\Tools.
  • Copy and paste the following command into the prompt and press enter.
    Code:
    ProcMon.exe /accepteula /quiet /EnableBootLogging
  • Attempt to install the update just like you have in the past. Let the machine reboot and revert just like it has in the past.
  • After the machine has rebooted and come back up to the desktop, open an elevated command prompt and navigate to C:\tools.
  • Copy and paste the following command to create the Bootlog Trace file.
    Code:
    ProcMon.exe /ConvertBootLog C:\Tools\bootlog.pml
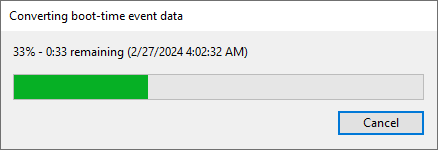
  • Now the following window will appear and the bootlog will be created, wait for it to complete.
    procmon-bootlog.png
  • Zip up the Bootlog.pml file as well as your CBS.log and upload it to a file sharing service like: WeTransfer - Send Large Files & Share Photos Online - Up to 2GB Free
  • Attach also a new copy of the CBS logs for the time stamps.
 

Has Sysnative Forums helped you? Please consider donating to help us support the site!

Back
Top