Windows 10 DISM corrupt, and repair install failing with error 0x80070003 - 0x2000D

Hexados

Member
Joined
Mar 24, 2022
Posts
7
Hello everyone!,

I am new to these forums. I hope you're all doing well :)

As the title states, I have a problem with a corrupted Windows 10. There are actually numerous problems that are all interrelated. The problem is that commands like DISM do not work, and almost always return error 2. The reason I had attempted DISM, is because the Windows Update seemed to have been corrupted and is unable to install the latest updates relating to the cumulative update of 2022-03, and the .NET Framework 3.5 and 4.8. The installation starts, reaches 20%, then goes back to 0%, then again back to 20%, then back to 0%... rinse and repeat. So, I figured that maybe my .NET Framework has a problem so I downloaded the offline installer, and the installer just wouldn't start (Windows Installer works fine on other setups, however). This one just doesn't show me a thing. No prompts, no indicators... nothing. So, I tried to repair the installation with DISM... well, well, well, DISM too is corrupt. I can't even perform a simple cleanup components command, nevermind scan/restore health. So, I went to the SFC scan. This one at least executed properly, but stated that I have some corrupted system files. So, with all of the aforementioned failing, I tried to repair install Windows 10 itself whilst keeping my files. I've done this before, and it almost always worked (underline "almost"). This time, I got a disgusting error after 2 hours, which is 0x80070003 - 0x2000D. So, I tried looking up online some fixes, and they all turned out to be just glorified HTML pages that regurgitate the "solutions" that Microsoft provides (the ones that we all know that never work. I mean, seriously, one has "defragment your HDD" in it as a solution. WTF?!). Well, what I tried is to reinstall my already existing .NET Framework installations, but even with the /repair command in cmd, it always pushed me to the page where it states that the current or higher version of .NET Framework is already installed, and the one for version 3.5 doesn't even open at all for some reason.

OK, so back to try and repair install Windows 10, but this time using a new admin user, and clean boot. So, clean desktop with new user, clean boot, all ready. The error was still exactly the same. I noticed that at around 86% on that bluescreen when I'm repairing Windows 10 (it's not the BSOD, but just the background color blue that shows the progress of the repair, before it goes into the restart sessions), it suddenly goes to boot, and I get that screen where it says that it's working on updates/changes, etc. (where you see a blurry screen, as if the GPU isn't loaded at first or something). So, when it reaches 12%, it hangs there a bit and then it just crashes. Before I know it, I'm staring at the Windows logo boot screen with an info text telling me that it is undoing all the changes it did to my computer, and once it boots again, I see the error 0x80070003 - 0x2000D. DISM is failing with error 2 no matter what. It turns out, some @$$hole of a developer decided that it would be a good idea to keep some system files in none other than the TEMP folder in the appdata\local\ directory. It's after this that the DISM no longer worked whatsoever (I could be wrong, but it's after my "careful" bloating clean up sessions that this began to happen, a few days ago, though I didn't even touch anything that is found in the Windows Folder itself.). So, although my computer is technically working, if something goes bad, I cannot repair it. This is why I am posting the DISM and CBS log files, to try and resolve this manually, by replacing the files that are missing, and repairing those that are corrupt. SFC Scan works, but it is unable to repair the issues present (as usual). So, what I am trying to do is repair the DISM so that I can conduct a proper repair from the installation disk (that I currently have as .ISO). Can this be done? In my opinion it should be possible, but I do need help. Oh, and by the way, I also downloaded and installed the latest Windows ADK, to maybe try and run the cmd command from there (Alt + F, M, S) and restore everything (including the DISM itself on my system), but no such luck. It returned the same error, unfortunately.

In any case, I saw this thread from two years ago, and it was quite similar to the problem I had, so all hope is not exactly lost.

This thread here:

[SOLVED] - DISM /ScanHealth file not found stopping windows update

So, I'm thinking of solutions here, and honestly, I just thought of posting the picture of the error of the Windows 10 repair install, and the error logs from SFC and DISM respectively. I just want to figure out if I can manually repair and replace the corrupted files based on these logs. If possible, please upload them so that I may replace them afterwards (if possible), or if I can use that Farbar Recovery Scan tool to repair/replace/fix the missing/corrupt files, I would also go for it. It's honestly the first time I get such a level of corruption, where even the DISM itself is corrupt, and not even the repair install helps.


Here are my computer specs:

Case: ThermalTake Chaser A71 Full Tower (five-fan cooled)
Motherboard: ASUS Z97-A LGA 1150
Power Supply: ThermalTake Smart SE 850 W
CPU: Intel Core i7-4790k
GPU: ASUS Strix GTX 970 (4GB)
RAM: Kingston HyperX DDR3 (4 x 8GB)
Storage 1: Kingston HyperX Savage 240GB
Storage 2: Seagate Barracuda 1TB 7200 RPM
OS: Windows 10 Professional (64-bit)
Windows Version: 21H2 (OS Build 19044.1469)
 

Attachments

  • Untitled.png
    Untitled.png
    20.6 KB · Views: 4
  • dism.log
    dism.log
    30 KB · Views: 2
  • CBS.log
    CBS.log
    111.2 KB · Views: 3
I realize you've said you've tried some of what follows already, but I am including it for future readers, too.

Whenever inexplicable issues present themselves “out of the blue” and with seemingly no reason, these are the two things I try first, in order:

1. Using DISM (Deployment Imaging Servicing and Management) and SFC (System File Checker) to Repair Windows 8.1, 10 & 11

2. Performing a Windows 10 or 11 Repair Install or Feature Update Using the Windows ISO file

If #1 fixes the issue, #2 is unnecessary.

If neither of the above fixes the issues or you simply can't get any of these utilities to work, it is my opinion that you have a Windows 10 instance that has such corruption that attempting fixes to it is just not worth it. Even if you can fix individual issues it ends up begin a perpetual game of "whack a mole" and you never have a system you can trust. So, if both of the above do not work or cannot be completed successfully, what I do next is one of the following, depending on what you may already have done or how you prefer to create the USB install media:

Doing a Completely Clean (Re)install of Windows 10 Using Media Creation Tool to Fetch the Win10 ISO File

or

Doing a Completely Clean (Re)install of Windows 10 Using Media Creation Tool to Create Bootable Win10 Install Media on a USB Thumb Drive

It goes without saying that before you do a completely clean reinstall you want to back up your user data. You're going to have to copy it back after you have a brand spankin' new Windows 10 instance. If you had a lot of different software installed, you will need to have collected your various installers and license keys, where needed.

This is exactly what I am trying to avoid, actually. It's not a mere collection of software and license keys that I just need to backup (I already always back these up anyway, including all important data), but how much time it took me to install the myriad of software that I already have in my system. Given that my system is still functional, technically speaking, I would rather repair corrupted files then just go for "OK, time for a format and clean install". I never ever ever format a computer unless the user in question specifically asks me to. Out of the dozens of laptops that I've personally fixed (software wise), the number of users I had to tell that their computer needs formatting is exactly 0. The only time a "format" is conducted, is due to a hardware issue, where the HDD drive itself fails, and it's completely impossible to interface with it.

In any case, it's just the DISM that mainly needs fixing. If I manage to pull that off (with help from this forum, of course), then I can conduct all the other repairs on my own, as I do already have a proper image of Windows that I am currently using (as a .ISO file). I would just use DISM on that, and problem solved... well... after fixing DISM itself anyway. All other commands like SFC (for example) are working just fine. So, I'm hoping for a fix, maybe using Farbar Recovery Scan Tool (again, similar to the thread I referred to above)? It's why I posted the SFC and DISM logs after all... as well as that "COMPONENTS" zip file.
 
This is exactly what I am trying to avoid, actually.

Which I get. You may want to post a message to the Windows Update forum, which handles issues with SFC/DISM malfunctions, too.

We're of different philosophies about when we "nuke and pave" and clearly have different approaches to taking routine full system images, too.

But you are more likely to get the "under the hood" advice you're seeking in the Windows Update forum, making reference to this one. It may end up being moved.
 
Hi and welcome to sysnative,

The COMPONENTS hive is severely damaged, do you have backups of the system drive to search for a suitable copy of it?

==== Critical Errors ====
Critical registry key "COMPONENTS\DerivedData\VersionedIndex\10.0.19041.1525 (WinBuild.160101.0800)\ComponentFamilies" exists but has no subkeys
Unfortunately, I do not :(. My backups are offline backups, where I save all my software and data to an external drive. I've never thought of creating an image of my own system. I do have my laptop with a Windows 10 though, and though I'm certain they'll have innumerous differences, maybe they have things in common? I understand that this is highly unlikely, but I mean it's worth asking.
 
Hi,

Step 1. Please run MemTest86 for at least 8 passes (will require two runs of 4 passes) using these instructions - Test RAM with PassMark MemTest86

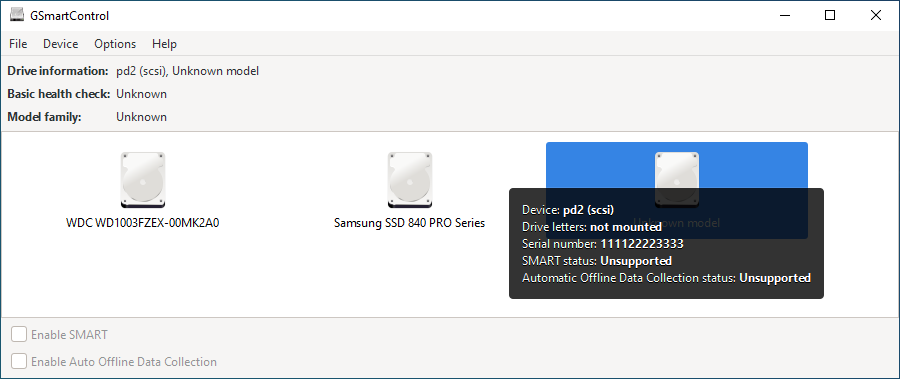
Step 2. Follow the instructions below to check your SMART status with GSmartControl.

Download
621b954633e7e-gsmartcontrol.png
GSmartControl to your desktop.
  • Extract the zip file to your Desktop. Open the folder gsmartcontrol-1.1.4-win64 which should be located on your Desktop and double-click gsmartcontrol.exe to launch the program.
  • Identify your drive in the list (if recognized by the tool), and hover your mouse over it.
  • Please note: If the SMART Status reads: Unsupported, stop and let me know.
621baa88433f0-GSmartControlUnsupported.png

  • Otherwise: > double-click on the (problematic) drive you want to test.
  • Open the Self-Tests tab, then select Extended Self-test in the Test type drop-down list and click on Execute (this test can take a few hours to complete).
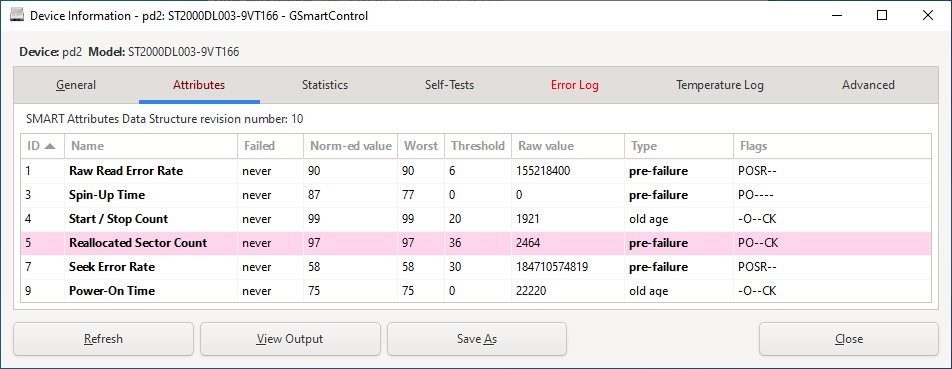
  • Open the Attributes tab and if you have any entries highlighted in red or pink, take a screenshot of the GSmartControl window and attach it in your next reply;
621b9aa6d906a-GSmartControl.png

OK, concerning the second step, I have absolutely no issues. The scan took around 1 minute and everything was fine. I could've have told you that I'm 1000% certain that I have no hardware issues, but I guess a lot of the text I'm writing is going unheeded. In any case, concerning step 1... !@#$. And I say again !@#$. I did a 22.5 hour hyperextensive test just to show my RAM is perfectly fine, only for the latter NOT to save the report generated in the .html file advertised. I followed the instructions to the letter, reading it over and over again to make sure I didn't miss a single step, and it pulls this crap on me. In any case, the final report was that Pass complete. No errors reported, even after all that time. Anyway, here is the SSD log from GSmartControl, as well as another report from the Hard Disk Sentinel that I had since forever (some 7 years ago).
 

Attachments

Hi,

These kind of corruptions are often caused by malfunctioning hardware components, but good to hear that there are no hardware issues. You've posted this problem also at TenForums, and you don't want to perform a repair or clean install. But that's the only way to fix this problem, there's no other option to restore the corrupt COMPONENTS hive.
Haha, yea, guilty as charged. I decided to go to numerous forums to get help with this issue. Speaking of which, is there maybe a way to repair my system using an EXTERNAL DISM? I have created a bootable WinPE and enabled numerous commands in it using Windows ADK. I am able to boot through it, but for some reason, the DISM still shows the exact same error. Is there something that I have maybe missed? I mean, technically, when I booted through the WinPE, the C:\ drive one which my OS is installed is now offline, no? If so, then why did DISM fail in the same way it did when my OS was online? The only possible explanation I could think of is that it maybe due to a wrong way that I wrote the DISM command to run. I went into DISKPART to see which drive my OS is currently allocated to (as I was booting through WinPE), and it showed that it is the F: drive there. No problem, I just went with a X:\DISM /Image:F:\ /Cleanup-Image /Restorehealth command, and as I said, it still failed. Is there anything that I can provide on this level to further tackle this down, and hopefully resolve it?
 
Hi,

Hexados said:
(...) is there maybe a way to repair my system using an EXTERNAL DISM?
No that's not possible, the COMPONENTS hive is badly damaged, and cannot be fixed with DISM.

Hexados said:
when I booted through the WinPE, the C:\ drive one which my OS is installed is now offline, no? If so, then why did DISM fail in the same way it did when my OS was online? The only possible explanation I could think of is that it maybe due to a wrong way that I wrote the DISM command to run.
You get the same error message, because a subkey (ComponentFamilies) of the COMPONENTS hive is completely empty. This means that there are approximately twenty-thousand of missing registry keys. If there was a possibility to fix the corrupted hive, we had provided a solution yet.
 
Hi,


No that's not possible, the COMPONENTS hive is badly damaged, and cannot be fixed with DISM.


You get the same error message, because a subkey (ComponentFamilies) of the COMPONENTS hive is completely empty. This means that there are approximately twenty-thousand of missing registry keys. If there was a possibility to fix the corrupted hive, we had provided a solution yet.
Oh God! That many?! What if we re-register every single one of these keys manually in a script? Even the ones that are intact? Would that maybe fix the issue?
Also, there is something very strange that occurred with me yesterday. So, I decided to give SFC scan another try, after which I made an attempt with WinPE again. After all of this, I restarted my PC in Safe Mode with Networking, and then created a bootable USB from an .ISO file I had downloaded using Media Creation Tool, and the tool used for this bootable USB was Rufus. After this, I went ahead and went with Windows Repair All-In-One (Tweaking.com). I chose the following options:

-Reset Registry Permissions
-Register System Files
-Repair WMI
-Remove Temp Files
-Repair Proxy Settings
-Repair Windows Updates
-Repair Volume Shadow Copy Service
-Repair Windows Sidebar/Gadgets
-Repair MSI (Windows Installer)
-Repair Windows App Store (Completely Reset App Store)
-Repair Windows Component Store
-Restore Windows COM+ Unmarshalers

Next, after all was complete, I rebooted into safe mode, went to SFC scan again, rebooted again to normal mode, and then disconnected myself from the internet. I inserted my bootable USB, and then went ahead with setup.exe to initiate the Windows 10 Repair. This time, it actually worked... or so I thought. After the installation, DISM finally worked, but now there were things that were... ahem... worse. You see, for some reason, despite having completely function cmdlets again, but a lot of things were also out of place. For starters, "Settings" app wasn't working. It appeared as usual, but nothing happened when I clicked on it. I tried to open sound settings, but also nothing happened. Windows Updates? App Store? Anything related to "Settings" App? You guessed it... Nothing! I tried all fixes in CMD that reinstalled Windows Store, reset "Settings" app, etc., but nothing worked. Numerous restarts, numerous SFC scans and numerous failed DISM attempts (DISM did complete, but it couldn't do squat). Gave Windows AIO another go, but it did nothing. All it did is make the option of "Settings" when I wrote it in the search bar, disappear! So, yea... the "repair install" that was supposed to fix things, the one that finally supposedly "worked", backfired big time! I couldn't even access the very thing that would help me go back in time, and put things back using Windows.old! Thankfully, though, Powershell and CMD were working perfectly (as stated previously), and managed to make it happen... so, now I'm back to square one, to when I asked this question.

What, in your opinion, do you think caused this huge backfire??
 
Hi,

Hexados said:
Oh God! That many?! What if we re-register every single one of these keys manually in a script? Even the ones that are intact? Would that maybe fix the issue?
If you had recent backups with a copy of the COMPONENTS hive, then it might be possible to reconstruct some of it, but there is no guarantee it would work. Your suggested option to re-register every single key is an impossible task! The COMPONENTS hive is a unique database with keys and values. So it's not like you can rebuild it with default keys.

Hexados said:
What, in your opinion, do you think caused this huge backfire??
Now you are trying all sorts of things to fix a problem that can't be fixed. Once more, perform a clean install - it is the only way to resolve this problem. An repair install failed as well, so you can't fix it in the way that you want - with tools - and build-in functions like DISM and SFC.

There are several causes for this kind of corruptions, like:
- Third-party cleaning tools such as registry cleaners and/or doubtful optimizing/tweaking tools.
- Power and system failures during the Windows Update process.
- Unexpected or forced shutdowns of the system.

I don't know how to convince you, but please perform a clean install - and make regular backups of the system in the future to avoid problems like this.
 

Has Sysnative Forums helped you? Please consider donating to help us support the site!

Back
Top