[SOLVED] Win11 Updates Failing, Error - 0x800705b9

Accela

Member
Joined
Apr 10, 2024
Posts
15
Hello there! I'm currently having trouble installing the Windows update labeled "2024-04 Cumulative Update for Windows 11 Version 23H2 for x64-based Systems (KB5036893)". I keep getting the message "Install error - 0x800705b9" no matter how many times I try to install it. I've spent multiple hours looking for a fix that doesn't involve having to completely wipe my hard drive but I haven't had any luck.

Here are some things that I've already tried:
1. I tried downloading the newest update manually through the Microsoft Update Catalog, but I still get an "Installation Failed" error message.
2. I tried uninstalling and reinstalling updates through Windows Update.
3. I've tried to do a repair install using the Windows 11 .iso file but the installer consistently closes out and sends me back to the desktop when it reaches 59%. It also gives me a "Windows 11 Installation Failed" error message.
4. I ran the Windows Update Troubleshooter. It claims that it fixed something but the problem still persists.
5. I tried running chkdsk, still no luck.
6. I tried running sfc. It initially said that it fixed something, but as of now it's telling me that it didn't find any integrity violations. Still didn't fix the problem.
7. I tried running DISM but I get hit with the following error message:

"Error: 193

An error occurred while attempting to start the servicing process for the image located at C:\.

For more information, review the log file."

Researching this error is what led me to this forum. Specifically this thread: DISM /online error 193
If what cybot is saying is correct, there seems to be an issue with the folder "C:\windows\system32\downlevel" though I don't really know what any of that means and I don't know how I'd fix it.

8. Components scanner is giving me a couple errors. Also don't know what they mean but I'll post them here.

Thank you in advanced, I'm desperately trying to find a solution. :c
 

Attachments

Hi and welcome to Sysnative,

Please run the following command in an elevated prompt and copy and paste the result in your next post.
Code:
certutil -hashfile C:\WINDOWS\Servicing\Packages\Wrapper-2D33A3BADEB27BAC6C52EB93FF26F3A61289D68ED832EE4D7D27A78C0E7DFF40~31bf3856ad364e35~amd64~~10.0.22621.3294.mum sha256
 
Code:
SHA256 hash of C:\WINDOWS\Servicing\Packages\Wrapper-2D33A3BADEB27BAC6C52EB93FF26F3A61289D68ED832EE4D7D27A78C0E7DFF40~31bf3856ad364e35~amd64~~10.0.22621.3294.mum:
7be12613e0282ea3fedac4a4c669127b334af0a349321a7a52de261878f5dc77
CertUtil: -hashfile command completed successfully.
 
Step 1. Download
6530fbb0f4101-56f31e53c97da-SFCFix.PNG
SFCFix and save it to your desktop.

Warning: This fix was written specifically for this system. Do not run this fix on another system.
  • Save any work you have open, and close all programs.
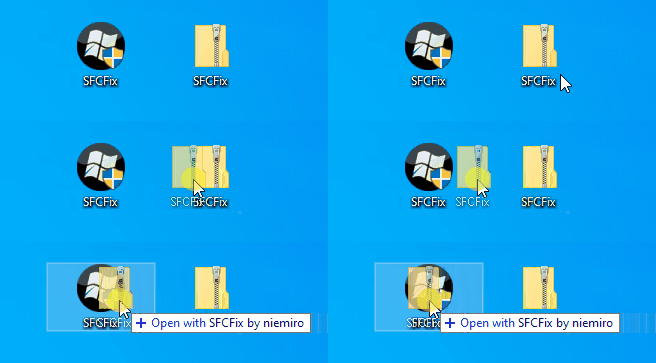
  • Download the attachment SFCFix.zip and save it to your desktop.
  • Drag the SFCFix.zip file over the SFCFix.exe executable and release it.
650c22f99662d-6190d993a26f3-SFCFix-Zip-Eng.gif

  • SFCFix will launch, let it complete.
  • Once done, a file will appear on your desktop, called SFCFix.txt.
  • Post the logfile (SFCFix.txt) as attachment in your next reply.


Step 2. Run the following DISM command and post the result. If it fails attach a new copy of the CBS log.
Code:
DISM /online /cleanup-image /RestoreHealth
 

Attachments

Hey there! Everything seems to be working now. I was able to successfully run both SFCFix and DISM and I'm no longer receiving an error. I restarted my computer and the Windows update finally went through. I'll go ahead and post the log files just in case there's anything else that you need to check. Anyways, thank you so much for your help! This issue was very stressful and annoying to deal with and you saved me a ton of trouble. Really did not feel like doing a clean install of Windows. I will definitely keep this website as a reference in case I run into more problems in the future.
 

Attachments

Hi,

You're welcome. Glad to hear you were able to update now, but please do the following so I can check some things into the registry. It seems some keys are not set correctly.

Download the
577bf0efb8088-FRST.png
Farbar Recovery Scan Tool and save it to your Desktop:

Download the 64 bit version: - Farbar Recovery Scan Tool Link

  • Download the attachment fixlist.txt and save it to your desktop.
  • Right-click on FRST.exe and select "Run as administrator".
  • Press the Fix button.
  • If for some reason the tool needs a restart, please make sure you let the system restart normally.
  • When finished, a log called Fixlog.txt will appear in the same directory the tool is run from.
  • Post the logfile Fixlog.txt as attachment in your next reply.
 

Attachments

As expected some keys are not set correctly, I'll need to update my Windows 11 VM to export the correct keys so this can take some time. In the meantime I would suggest to make a full system image of this system first. Then we can apply the next fix to repair the remaining issues which may cause issues with the upcoming updates...
 
Okay, when the image is ready please do the following.

Download the
577bf0efb8088-FRST.png
Farbar Recovery Scan Tool and save it to your Desktop:

Download the 64 bit version: - Farbar Recovery Scan Tool Link

Warning: This script was written specifically for this system. Do not run this script on another system.

  • Download the attachment fixlist.txt and save it to your desktop.
  • Right-click on FRST.exe and select "Run as administrator".
  • Press the Fix button.
  • If for some reason the tool needs a restart, please make sure you let the system restart normally.
  • When finished, a log called Fixlog.txt will appear in the same directory the tool is run from.
  • Post the logfile Fixlog.txt as attachment in your next reply.
 

Attachments

Rich (BB code):
Registry ====> HKEY_CLASSES_ROOT\CLSID\{0823B6F8-F499-4d5e-B885-EA9CB4F43B24}\LocalServer32 <==== Access Denied
Registry ====> HKEY_LOCAL_MACHINE\SOFTWARE\Classes\CLSID\{0823B6F8-F499-4d5e-B885-EA9CB4F43B24}\LocalServer32 <==== Access Denied
Registry ====> HKEY_LOCAL_MACHINE\SOFTWARE\Classes\WOW6432Node\CLSID\{0823B6F8-F499-4d5e-B885-EA9CB4F43B24}\LocalServer32 <==== Access Denied
Registry ====> ERROR: Error accessing the registry.

Unfortunately, a part of the fix failed, so please do the following.

Please follow these instructions to run the
577bf0efb8088-FRST.png
Farbar Recovery Scan Tool with system privileges.

Warning: This script was written specifically for this system. Do not run this script on another system.
  • Download PsExec from Microsoft Sysinternals to your desktop.
  • Unzip PsTools.zip to its own directory on the system drive, for example: C:\Tools\PsTools
  • Navigate in an elevated command prompt to the PsTools directory: cd C:\Tools\PsTools.
  • Now copy and paste the following command into the command prompt and press enter. Click on the Agree button when the licence agreement of PsExec appears.
  • Note: Ensure that both FRST64.exe and the Fixlist.txt file are on your desktop! Otherwise you'll need to ammend the command to the right location.
    Code:
    psexec -i -d -s "%userprofile%\desktop\FRST64.exe"
  • FRST will make a new backup of the registry first, please wait until this process is completed.
  • Ensure the provided Fixlist.txt is in the same location as FRST64.exe and then press the Fix button.
  • If for some reason the tool needs a restart, please make sure you let the system restart normally.
  • When finished, a log called Fixlog.txt will appear in the same directory the tool is run from.
  • Post the logfile Fixlog.txt as attachment in your next reply.
 

Attachments

Hmm, still the same "Access Denied" error, so I will do some tests on a VM here to see if I can reproduce this issue...
 
It seems FRST is the issue in here, SFCFix completed successfully on a VM here. So please do the following.

Step 1.
Warning: This fix was written specifically for this system. Do not run this fix on another system.
  • Save any work you have open, and close all programs.
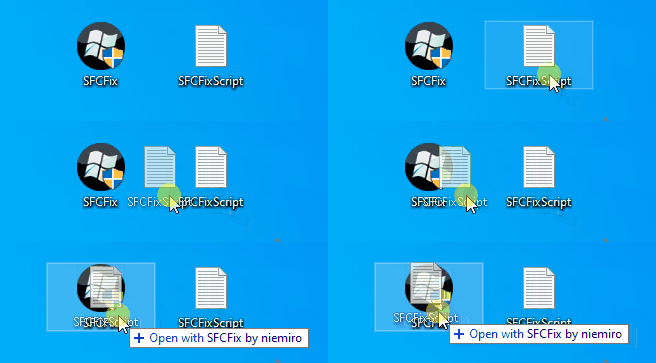
  • Download the attachment SFCFixScript.txt and save it to your desktop.
  • Drag the SFCFixScript.txt file over the SFCFix.exe executable and release it.
650ef5dbdfd06-62151e1bebac4-SFCFix-Txt-Eng.gif

  • SFCFix will launch, let it complete.
  • Once done, a file will appear on your desktop, called SFCFix.txt.
  • Post the logfile (SFCFix.txt) as attachment in your next reply.

Step 2. Reboot the system and start the
577bf0efb8088-FRST.png
Farbar Recovery Scan Tool again.
  • Download the attachment fixlist.txt and save it to your desktop.
  • Right-click on FRST.exe and select "Run as administrator".
  • Press the Fix button.
  • If for some reason the tool needs a restart, please make sure you let the system restart normally.
  • When finished, a log called Fixlog.txt will appear in the same directory the tool is run from.
  • Post the logfile Fixlog.txt as attachment in your next reply.
 

Attachments

Great, the fix completed succesfully. So please run the following DISM command again and post a new copy of the CBS log to see if the latest issue has been resolved.
Code:
DISM /online /cleanup-image /RestoreHealth
 
I'm getting the message

Code:
[===                        6.7%                           ]
Error: 2

The system cannot find the file specified.

The DISM log file can be found at C:\WINDOWS\Logs\DISM\dism.log
 

Attachments

Rich (BB code):
2024-04-14 06:17:06, Error                 CSI    00000008 (F) STATUS_OBJECT_NAME_NOT_FOUND #55596# from Windows::Rtl::SystemImplementation::DirectRegistryProvider::SysOpenKey(flg = 0, key = {provider=NULL, handle=0, name= ("null")}, da = (KEY_READ|KEY_WOW64_64KEY), oa = @0x9ef57b3d0->OBJECT_ATTRIBUTES {s:48; rd:NULL; on:[211]'\Registry\Machine\COMPONENTS\DerivedData\VersionedIndex\10.0.22621.3447 (WinBuild.160101.0800)\ComponentFamilies\amd64_containers-server-merged-deployment_31bf3856ad364e35_none_0e9398c2c6c1712a\v!10.0.22621.3296'; a:(OBJ_CASE_INSENS[gle=0xd0000034]
2024-04-14 06:17:06, Error                 CSI    ITIVE)}, disp = Invalid)[gle=0xd0000034]

Here's the next fix.

Warning: This fix was written specifically for this system. Do not run this fix on another system.
  • Save any work you have open, and close all programs.
  • Download the attachment SFCFixScript.txt and save it to your desktop.
  • Drag the SFCFixScript.txt file over the SFCFix.exe executable and release it.
650ef5dbdfd06-62151e1bebac4-SFCFix-Txt-Eng.gif

  • SFCFix will launch, let it complete.
  • Once done, a file will appear on your desktop, called SFCFix.txt.
  • Post the logfile (SFCFix.txt) as attachment in your next reply.


Step 2. Run the following DISM command and post the result. If it fails attach a new copy of the CBS log.
Code:
DISM /online /cleanup-image /RestoreHealth
 

Attachments

Has Sysnative Forums helped you? Please consider donating to help us support the site!

Back
Top