[SOLVED] Server 2019 Version 1809 Build 17763.2114 Windows Update errors

TomasNetit

Well-known member
Joined
Apr 9, 2024
Posts
45
Hi Sysnative.

I'm having a windows update issue with a server 2019 VM.
It refuses to install any kind of update for 2 years.
I've tried countless things including those specified for logging this case.
I'm almost at the point of considering reinstalling.
Please help


DISM /Online /Cleanup-Image /RestoreHealth

Deployment Image Servicing and Management tool
Version: 10.0.17763.1697

Image Version: 10.0.17763.2114

[==========================100.0%==========================]
Error: 0x800f081f

C:\Windows\system32>sfc /scannow
Beginning system scan. This process will take some time.

Beginning verification phase of system scan.
Verification 100% complete.

Windows Resource Protection found corrupt files but was unable to fix some of them.
For online repairs, details are included in the CBS log file located at
windir\Logs\CBS\CBS.log. For example C:\Windows\Logs\CBS\CBS.log. For offline
repairs, details are included in the log file provided by the /OFFLOGFILE flag.


I cannot repair the OS.

also i try:
net stop wuauserv
net stop cryptSvc
net stop bits
net stop msiserver
Ren C:\Windows\SoftwareDistribution SoftwareDistribution.old
Ren C:\Windows\System32\catroot2 Catroot2.old
net start wuauserv
net start cryptSvc
net start bits
net start msiserver

nothing helped. Pls help.

Thank you
 

Attachments

Hi,

Step 1. Download
6530fbb0f4101-56f31e53c97da-SFCFix.PNG
SFCFix and save it to your desktop.

Warning: This fix was written specifically for this system. Do not run this fix on another system.
  • Save any work you have open, and close all programs.
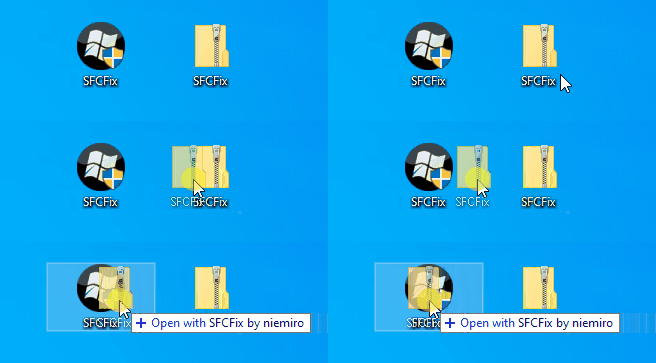
  • Download the attachment SFCFix.zip and save it to your desktop.
  • Drag the SFCFix.zip file over the SFCFix.exe executable and release it.
650c22f99662d-6190d993a26f3-SFCFix-Zip-Eng.gif

  • SFCFix will launch, let it complete.
  • Once done, a file will appear on your desktop, called SFCFix.txt.
  • Post the logfile (SFCFix.txt) as attachment in your next reply.


Step 2. Run the following DISM command and post the result. If it fails attach a new copy of the CBS log.
Code:
DISM /online /cleanup-image /RestoreHealth
 

Attachments

Hi Maxstar,

SFCLog:
PowerCopy::
Successfully took permissions for file or folder C:\windows\WinSxS\amd64_microsoft-windows-t..enseserver-tlsbrand_31bf3856ad364e35_10.0.17763.1075_none_9c481b71554a77d4\tls_branding_config.xml
Successfully took permissions for file or folder C:\windows\WinSxS\amd64_microsoft-windows-t..enseserver-lrwizdll_31bf3856ad364e35_10.0.17763.1_none_f5101f628983b202\LServer_PKConfig.xml

Successfully copied file C:\Users\administrator\AppData\Local\niemiro\Archive\WinSxS\amd64_microsoft-windows-t..enseserver-tlsbrand_31bf3856ad364e35_10.0.17763.1075_none_9c481b71554a77d4\tls_branding_config.xml to C:\windows\WinSxS\amd64_microsoft-windows-t..enseserver-tlsbrand_31bf3856ad364e35_10.0.17763.1075_none_9c481b71554a77d4\tls_branding_config.xml.
Successfully copied file C:\Users\administrator\AppData\Local\niemiro\Archive\WinSxS\amd64_microsoft-windows-t..enseserver-lrwizdll_31bf3856ad364e35_10.0.17763.1_none_f5101f628983b202\LServer_PKConfig.xml to C:\windows\WinSxS\amd64_microsoft-windows-t..enseserver-lrwizdll_31bf3856ad364e35_10.0.17763.1_none_f5101f628983b202\LServer_PKConfig.xml.

Successfully restored ownership for C:\windows\WinSxS\amd64_microsoft-windows-t..enseserver-tlsbrand_31bf3856ad364e35_10.0.17763.1075_none_9c481b71554a77d4\tls_branding_config.xml
Successfully restored permissions on C:\windows\WinSxS\amd64_microsoft-windows-t..enseserver-tlsbrand_31bf3856ad364e35_10.0.17763.1075_none_9c481b71554a77d4\tls_branding_config.xml
Successfully restored ownership for C:\windows\WinSxS\amd64_microsoft-windows-t..enseserver-lrwizdll_31bf3856ad364e35_10.0.17763.1_none_f5101f628983b202\LServer_PKConfig.xml
Successfully restored permissions on C:\windows\WinSxS\amd64_microsoft-windows-t..enseserver-lrwizdll_31bf3856ad364e35_10.0.17763.1_none_f5101f628983b202\LServer_PKConfig.xml
PowerCopy:: directive completed successfully.

Successfully processed all directives.
SFCFix version 3.0.2.1 by niemiro has completed.
Currently storing 2 datablocks.

DISM:
C:\windows\system32>DISM /online /cleanup-image /RestoreHealth

Deployment Image Servicing and Management tool
Version: 10.0.17763.1697

Image Version: 10.0.17763.2114

[===========================86.1%================= ]
Error: 0x800f081f

The source files could not be found.

Thank you
 

Attachments

Hi,

Here's the next fix.

Step 1.
Warning: This fix was written specifically for this system. Do not run this fix on another system.
  • Save any work you have open, and close all programs.
  • Download the attachment SFCFix.zip and save it to your desktop.
  • Drag the SFCFix.zip file over the SFCFix.exe executable and release it.
650c22f99662d-6190d993a26f3-SFCFix-Zip-Eng.gif

  • SFCFix will launch, let it complete.
  • Once done, a file will appear on your desktop, called SFCFix.txt.
  • Post the logfile (SFCFix.txt) as attachment in your next reply.


Step 2. Run the following DISM command and post the result. If it fails attach a new copy of the CBS log.
Code:
DISM /online /cleanup-image /RestoreHealth
 

Attachments

Hello,

It’s been 12 hours 85,7%, and it’s still going. Should I wait?
I hope it didn’t freeze.


C:\windows\system32>DISM /online /cleanup-image /RestoreHealth

Deployment Image Servicing and Management tool
Version: 10.0.17763.1697

Image Version: 10.0.17763.2114

[===========================85.7%================= ]
 
Rich (BB code):
2024-04-10 20:12:54, Error                 CSI    0000180a (F) STATUS_OBJECT_NAME_NOT_FOUND #155011682# from Windows::Rtl::SystemImplementation::DirectFileSystemProvider::SysCreateFile(flags = 0, handle = {provider=NULL, handle=0, name= ("null")}, da = (FILE_GENERIC_READ), oa = @0x8f0d9cb418->OBJECT_ATTRIBUTES {s:48; rd:NULL; on:[132]'\SystemRoot\WinSxS\x86_microsoft-windows-d..files-x86-minkernel_31bf3856ad364e35_10.0.17763.5696_none_f522c8577906c8c3\r\bootmgr.exe'; a:(OBJ_CASE_INSENSITIVE)}, iosb = @0x8f0d9cb470, as = (null), fa = 0, sa = (FILE_SHARE_RE[gle=0xd0000034]
2024-04-10 20:12:54, Error                 CSI    AD|FILE_SHARE_WRITE|FILE_SHARE_DELETE), cd = FILE_OPEN, co = (FILE_NON_DIRECTORY_FILE|FILE_SYNCHRONOUS_IO_NONALERT|0x00004000), eab = NULL, eal = 0, disp = Invalid)
[gle=0xd0000034]

Hi,

Open an elevated command prompt and run the following command. Attach Dirlist.txt to your next post.
Code:
dir /s /a %systemroot%\WinSxS\x86_microsoft-windows-d..files-x86-minkernel_31bf3856ad364e35_10.0.17763.5696_none_f522c8577906c8c3 > "%userprofile%\Desktop\Dirlist.txt"
 
Please upload a copy of the COMPONENTS hive to look at the associated key.

Upload your COMPONENTS hive.
  • Navigate to C:\Windows\System32\Config and locate the COMPONENTS file.
  • Please copy this file to your desktop.
  • Note: If you receive an error that this file is in-use, simply reboot your computer and try again.
  • Right-click on this file on your desktop and select Send To > Compressed (zipped) folder. This will create a file named COMPONENTS.ZIP on your desktop.
  • If the file is too large to upload here, upload the file to www.wetransfer.com and post the link in your next reply.
 
The VM is too slow, its copy of the production server, for testing.
Are you able to assign more resources to this VM? In particular because DISM didn't complete last run and you have aborted it?

Here's the next fix.

Step 1.
Warning: This fix was written specifically for this system. Do not run this fix on another system.
  • Save any work you have open, and close all programs.
  • Download the attachment SFCFix.zip and save it to your desktop.
  • Drag the SFCFix.zip file over the SFCFix.exe executable and release it.
650c22f99662d-6190d993a26f3-SFCFix-Zip-Eng.gif

  • SFCFix will launch, let it complete.
  • Once done, a file will appear on your desktop, called SFCFix.txt.
  • Post the logfile (SFCFix.txt) as attachment in your next reply.


Step 2. Run the following DISM command and post the result. If it fails attach a new copy of the CBS log.
Code:
DISM /online /cleanup-image /RestoreHealth
 

Attachments

Hi,

yes i have aborted it because it was stuck for 15 hours on the same %.
I will assign more resources to the VM, run the SFCfix and i will send you the result.

The question is now how should i run it on the production server, like fix 1 than fix 2 than fix 3 ? or just the latest fix ?
 
Let's see if we can repair the cloned VM first. Then we can check the production server to see if the same fixes can be applied..
 
Deployment Image Servicing and Management tool
Version: 10.0.17763.1697

Image Version: 10.0.17763.2114

[==========================100.0%==========================] The restore operation completed successfully.
The operation completed successfully.
 
This looks good, are you able to update this VM as well without any further issues?
 
2024-04 Cumulative Update for Windows Server 2019 (1809) for x64-based Systems (KB5036896) 20% now installing... I'll let you know...
 
Great, let me know the result. If it fails attach a new copy of the CBS logs.
 

Has Sysnative Forums helped you? Please consider donating to help us support the site!

Back
Top