[SOLVED] Problem with windows 11 update (23H2)

tori

Member
Joined
Jul 7, 2024
Posts
5
I use translation software.

Hi.
I am trying to update Windows 11 but cannot get rid of the error. Can someone please tell me how to solve this problem?
There are two updates in question.
Windows 11, version 23H2
(error:0x800700c1)
2024-05 ActualizaciĆ³n acumulativa de .NET Framework 3.5 y 4.8.1 para Windows 11, version 23H2 para x64 (KB5037591)
(error:0x800700c1)

The results following the steps are as follows.

Step #1 - Run SFC Scan​

Windows Resource Protection could not start the repair service.

Step #2 - Run SURT/DISM​

Deployment Image Servicing and Management tool
Version: 10.0.22621.2792

Image Version: 10.0.22631.3155
[===========================84.9%================= ]
[===========================88.7%=================== ]
[==========================100.0%==========================]
Error: 0x800f081f

The source files could not be found.
Use the "Source" option to specify the location of the files that are required to restore the feature. For more information on specifying a source location, see Configure a Windows Repair Source.
The DISM log file can be found at C:\Windows\Logs\DISM\dism.log

Step #3 - Run ComponentsScanner​

The resulting file is attached.

Step #4 - Export CBS Folder​

The resulting file is attached.


Thanks.
 

Attachments

Hi and welcome to Sysnative,

Step 1. Download
6530fbb0f4101-56f31e53c97da-SFCFix.PNG
SFCFix and save it to your desktop.

Warning: This fix was written specifically for this system. Do not run this fix on another system.
  • Save any work you have open, and close all programs.
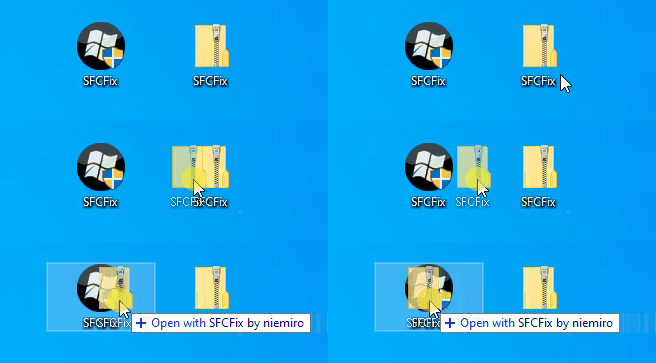
  • Download the attachment SFCFix.zip and save it to your desktop.
  • Drag the SFCFix.zip file over the SFCFix.exe executable and release it.
650c22f99662d-6190d993a26f3-SFCFix-Zip-Eng.gif

  • SFCFix will launch, let it complete.
  • Once done, a file will appear on your desktop, called SFCFix.txt.
  • Post the logfile (SFCFix.txt) as attachment in your next reply.


Step 2. Run the following DISM command and post the result. If it fails attach a new copy of the CBS log.
Code:
DISM /online /cleanup-image /RestoreHealth
 

Attachments

Hi.
Thank you for your support.
An error occurred when executing Step 2.
I am attaching the result files for each step.


Deployment Image Servicing and Management tool
Version: 10.0.22621.2792

Image Version: 10.0.22631.3155

[===========================84.9%================= ]
[===========================88.7%=================== ]
[==========================100.0%==========================]
Error: 0x800f081f

The source files could not be found.
Use the "Source" option to specify the location of the files that are required to restore the feature. For more information on specifying a source location, see Configure a Windows Repair Source.

The DISM log file can be found at C:\Windows\Logs\DISM\dism.log
 

Attachments

Hi,

Here's the next fix.

Step 1.
Warning: This fix was written specifically for this system. Do not run this fix on another system.
  • Save any work you have open, and close all programs.
  • Download the attachment SFCFix.zip and save it to your desktop.
  • Drag the SFCFix.zip file over the SFCFix.exe executable and release it.
650c22f99662d-6190d993a26f3-SFCFix-Zip-Eng.gif

  • SFCFix will launch, let it complete.
  • Once done, a file will appear on your desktop, called SFCFix.txt.
  • Post the logfile (SFCFix.txt) as attachment in your next reply.


Step 2. Run the following DISM command and post the result. If it fails attach a new copy of the CBS log.
Code:
DISM /online /cleanup-image /RestoreHealth
 

Attachments

Hi,
Here is the file with the execution results.
Thanks!


Deployment Image Servicing and Management tool
Version: 10.0.22621.2792

Image Version: 10.0.22631.3155

[===========================84.9%================= ]
[===========================88.7%=================== ]
[==========================100.0%==========================]
Error: 0x800f081f

The source files could not be found.
Use the "Source" option to specify the location of the files that are required to restore the feature. For more information on specifying a source location, see Configure a Windows Repair Source.

The DISM log file can be found at C:\Windows\Logs\DISM\dism.log
 

Attachments

Here's the next fix.

Step 1.
Warning: This fix was written specifically for this system. Do not run this fix on another system.
  • Save any work you have open, and close all programs.
  • Download the attachment SFCFix.zip and save it to your desktop.
  • Drag the SFCFix.zip file over the SFCFix.exe executable and release it.
650c22f99662d-6190d993a26f3-SFCFix-Zip-Eng.gif

  • SFCFix will launch, let it complete.
  • Once done, a file will appear on your desktop, called SFCFix.txt.
  • Post the logfile (SFCFix.txt) as attachment in your next reply.


Step 2. Run the following DISM command and post the result. If it fails attach a new copy of the CBS log.
Code:
DISM /online /cleanup-image /RestoreHealth
 

Attachments

Hi,
As a result of the execution, the DISM command ran successfully.
Thanks!

Deployment Image Servicing and Management tool
Version: 10.0.22621.2792

Image Version: 10.0.22631.3155

[==========================100.0%==========================] The restore operation completed successfully.
The operation completed successfully.
 

Attachments

Hi,
And when I tried the Windows 11 update again, it was successfully completed! Thanks very much!!
 
Hi,

You're welcome. Glad to hear the updates installed successfully now... (y)
 

Has Sysnative Forums helped you? Please consider donating to help us support the site!

Back
Top