Navigation
Install the app
How to install the app on iOS
Follow along with the video below to see how to install our site as a web app on your home screen.
Note: This feature may not be available in some browsers.
More options
You are using an out of date browser. It may not display this or other websites correctly.
You should upgrade or use an alternative browser.
You should upgrade or use an alternative browser.
[SOLVED] Corrupted Windows 10 file(s) CU updates fail
- Thread starter pfcooper
- Start date
pfcooper
Contributor
I reran the ComponentsScanner.exe again with another single screen output and failed, no indication of reason.
On my first sfc /scannow it finished at 10% saying "Cannot perform requested operation".
On my first DISM ScanHealth it failed at 85% with error 1392. The File or Directory is corrupted and unreadable.
This laptop was brought to me for help, only other complaint was that audio had recently stopped working.
The Feb CU had failed several times. I then paused updates for 2 weeks and after looking at status I came here for help.
Likely needs windows re-installed.
Last edited:
pfcooper
Contributor
The Feb CU failed with code 0x800f0989
Hi,
Upload your COMPONENTS hive.
Export CBS (Component Based Servicing) hive
Upload your COMPONENTS hive.
- Navigate to C:\Windows\System32\Config and locate the COMPONENTS file.
- Please copy this file to your desktop.
- Note: If you receive an error that this file is in-use, simply reboot your computer and try again.
- Right-click on this file on your desktop and select Send To > Compressed (zipped) folder. This will create a file named COMPONENTS.ZIP on your desktop.
- If the file is too large to upload here, upload the file to www.wetransfer.com and post the link in your next reply.
Export CBS (Component Based Servicing) hive
- Click on the Start button and type regedit
- When you see regedit on the list, right-click on it and select Run as administrator.
- When regedit opens, using the left pane, navigate to the following registry key and select it by clicking on it once.
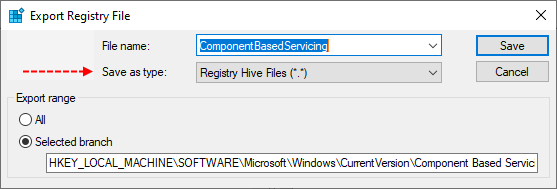
Code:HKEY_LOCAL_MACHINE\SOFTWARE\Microsoft\Windows\CurrentVersion\Component Based Servicing - Once selected, click File > Export....
- Change the Save as type: to Registry Hive Files (*.*).

- Name this file ComponentBasedServicing (with no file extension) and save it to your Desktop.
- Right-click on the saved file and choose Send > Compressed (zipped) Folder.
- Attach the .ZIP file to your next post.
- If the file is too large to upload here, upload the file to www.wetransfer.com and post the link in your next reply.
pfcooper
Contributor
Hi,
Download
 Crystal DiskInfo and save it to your Desktop.
Download

- Run the installer to install the program.
- When finished, open the installed program by double clicking on it.
- Good - There are no problems found, the drive is working properly.
- Caution - The drive have some problems. (which indicates a drive that you should most likely be thinking about backing up and replacing.)
- Bad - This usually indicates a drive that’s dead or near death. (! - Back up all important data as soon as possible.)
- Resize the window so that all information is visible.
- Take a screenshot of what you see and post it in your next reply.
pfcooper
Contributor
Step 1. Download
 SFCFix and save it to your desktop.
Warning: This fix was written specifically for this system. Do not run this fix on another system.

Step 2. Run the following DISM command and post the result. If it fails attach a new copy of the CBS log.
Warning: This fix was written specifically for this system. Do not run this fix on another system.
- Save any work you have open, and close all programs.
- Download the attachment SFCFix.zip and save it to your desktop.
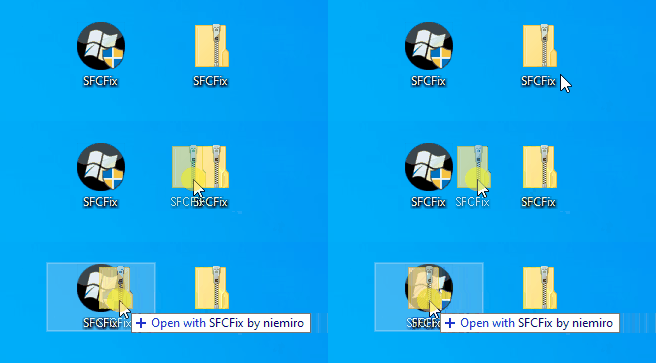
- Drag the SFCFix.zip file over the SFCFix.exe executable and release it.

- SFCFix will launch, let it complete.
- Once done, a file will appear on your desktop, called SFCFix.txt.
- Post the logfile (SFCFix.txt) as attachment in your next reply.
Step 2. Run the following DISM command and post the result. If it fails attach a new copy of the CBS log.
Code:
DISM /online /cleanup-image /RestoreHealthAttachments
pfcooper
Contributor
A large number of payload are missing, I would suggest to try an in-place upgrade first.
In-place upgrade
This will reinstall and update the operating system and fix any corruptions, without removing any file or program. But make always a backup of all your important data!
In-place upgrade
This will reinstall and update the operating system and fix any corruptions, without removing any file or program. But make always a backup of all your important data!
- Go to this Microsoft page and under the title Create Windows 10 installation media press on Download tool now.
- Save the tool on your Desktop and double click to run it.
- On the License terms page, if you accept the license terms, select Accept.
- On the What do you want to do page, select Create installation media (USB....) and then select Next.
- Choose the ISO file option. Once the download is complete, right click the ISO and select the option Mount.
- Open the Windows File Explorer and open mounted ISO, and run the setup.exe file.
- Follow the instructions and click on the option Change what to keep.
- Select the option Keep personal files and apps and click next.
- Windows Setup will now start the in-place upgrade installation to repair Windows.
pfcooper
Contributor
in-place upgrade completed.
Install portion took 4 hrs 5 min
updates took a further 1 hr 38 min
Windows Update reports "You're Up to Date"
winver: 22H2 19045.2728
One glitch. at the end of updates a small window opened saying:
An error has occurred
Failed to connect to an IPC Port:
The system cannot find the file specified.
OK (only choice in a box)
Nothing seemed to happen after clicking OK
Attempted to restart the laptop and HP logo appears with display saying "Preparing Automatic Repair"
followed by display saying "please wait while we install a system update" followed by a low beep
This process appears to be looping.
Will power off and attempt restart again.
Please advise if something specific needs to be done here, I will follow-up if I have any success.
pfcooper
Contributor
Hi
The only thing I managed to do was interrupt the loop and get into some HP diagnostics
I ran several tests and everything passed ok.
Would creating a bootable win10 usb be a solution? Could you guide me through that?
In the meantime I'll search for "How to change boot sequence on HP laptop"
The only thing I managed to do was interrupt the loop and get into some HP diagnostics
I ran several tests and everything passed ok.
Would creating a bootable win10 usb be a solution? Could you guide me through that?
In the meantime I'll search for "How to change boot sequence on HP laptop"
Hi,
So you want to create a bootable USB stick and then perform a clean installation?
So you want to create a bootable USB stick and then perform a clean installation?
pfcooper
Contributor
we need a way to get on the system, how can we do that with a loop at startup?
I'm on my own pc now
I'm on my own pc now
You can create a bootable USB-stick with the Media Creation Tool. Download Windows 10
pfcooper
Contributor
just to make sure, am I chatting with a person or a bot?
Do you have a theory for the system going into automatic repair on startup?
Do you have a theory for the system going into automatic repair on startup?
Yes, I'm a real person not a bot... 
I don't know what happend, but have you tried to boot the system with a USB-stick created with the Media Creation Tool?
I don't know what happend, but have you tried to boot the system with a USB-stick created with the Media Creation Tool?
pfcooper
Contributor
I'm going to create one now, if I follow the instructions you provided in an earlier post to create a ISO on desktop, can that be used to create the usb? This system
is same winver as the problem laptop
is same winver as the problem laptop
Yes, you can use the same tool to create a USB-stick, with the option create USB... for another PC.
pfcooper
Contributor
thanks.
Has Sysnative Forums helped you? Please consider donating to help us support the site!


