[SOLVED] DISM /Online /Cleanup-Image /RestoreHealth Error: 0x800f081f

DrFirestone

Member
Joined
Mar 16, 2023
Posts
20
Windows Server 2019 Standard - unable to repair the system. DISM /Online /Cleanup-Image /RestoreHealth keeps giving up:

Deployment Image Servicing and Management tool
Version: 10.0.17763.3406

Image Version: 10.0.17763.4131

[==========================100.0%==========================]
Error: 0x800f081f

The source files could not be found.
Use the "Source" option to specify the location of the files that are required to restore the feature. For more information on specifying a source location, see Configure a Windows Repair Source.


I guess this is also causing a problem with ugrading from Standard to Dataceter (screenshot attached).


I'm attaching the log file. Any help would be greatly appreciated!
 

Attachments

  • dism.log
    dism.log
    814.3 KB · Views: 2
  • Capture.PNG
    Capture.PNG
    17.4 KB · Views: 9
  • Capture.PNG
    Capture.PNG
    17.4 KB · Views: 8
  • dism.log
    dism.log
    814.3 KB · Views: 1
Hi and welcome to Sysnative,

Upload a copy of the CBS folder
  • Open Windows Explorer and browse to the C:\Windows\Logs folder.
  • Right-click on the CBS folder and choose Send to > Compressed (zipped) folder.
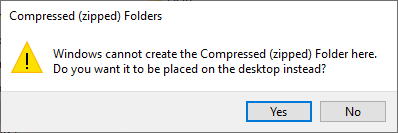
  • Now the message will appear, "Windows cannot create the Compressed (zipped) Folder here. Do you want it to be placed on the desktop instead?"
  • Click on the Yes button here.
618e949e09fef-CBS-Folder.png

  • Attach the file CBS.zip to your next reply.
 
Thanks for the reply! :-) Log files attached.

I had a brief look at the files there,and there seem to be some error messages about missing files for KB5021237... Could that be linked to the mentioned issue? I tried to install KB5021237 but it looks like it was superseded by now and cannot be installed...
 

Attachments

Hi,

Step 1. Download
56f31e53c97da-SFCFix.PNG
SFCFix and save it to your desktop.

Warning: This fix was written specifically for this system. Do not run this fix on another system.
  • Save any work you have open, and close all programs.
  • Download the attachment SFCFix.zip and save it to your desktop.
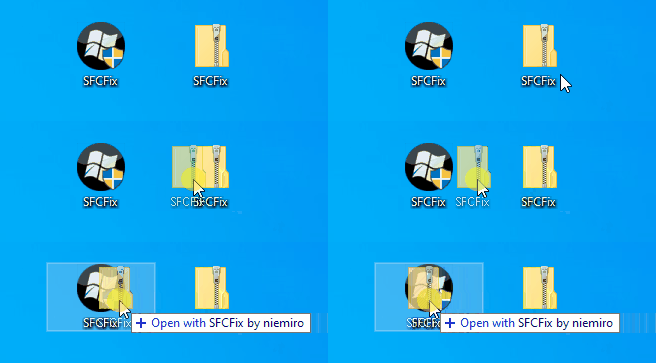
  • Drag the SFCFix.zip file over the SFCFix.exe executable and release it.
6190d993a26f3-SFCFix-Zip-Eng.gif

  • SFCFix will launch, let it complete.
  • Once done, a file will appear on your desktop, called SFCFix.txt.
  • Post the logfile (SFCFix.txt) as attachment in your next reply.


Step 2. Run the following DISM command and post the result. If it fails attach a new copy of the CBS log.
Code:
DISM /online /cleanup-image /RestoreHealth
 

Attachments

This sees to have finally cleared the error (screenshot). Thank you! :-)

I am still getting an error when trying to upgrade Standard to Datacenter (the error code is different this time)...

Deployment Image Servicing and Management tool
Version: 10.0.17763.3406

Image Version: 10.0.17763.4131

Starting to update components...
Starting to install product key...
Finished installing product key.

Removing package Microsoft-Windows-ServerStandardEdition~31bf3856ad364e35~amd64~~10.0.17763.1
[==========================100.0%==========================]

Error: 14081

An error occurred while operating system components were being updated. The upgrade cannot proceed.
For more information, review the log file.

The DISM log file can be found at C:\Windows\Logs\DISM\dism.log


I uploaded the log files (dism.log). Thanks in advance for helping me out with this annoying situation...
 

Attachments

  • Capture3.PNG
    Capture3.PNG
    52.7 KB · Views: 6
  • DISM.zip
    DISM.zip
    72.6 KB · Views: 3
Hi,

Follow these instructions to remove an update.
  • Open the Start menu of Windows and type the command CMD
  • When you see Command Prompt on the list, right-click on it and select Run as administrator.
  • When command prompt opens, copy and paste the following command into it, then press enter.
Code:
wusa /uninstall /KB:5021237
  • Let me know if it says it was successful or you get the message: The update KB5021237 is not installed on this computer.
 
Download the
577bf0efb8088-FRST.png
Farbar Recovery Scan Tool and save it to your Desktop:

Download the 64 bit version: - Farbar Recovery Scan Tool Link
  • Open the startmenu and type the command cmd.
  • After you find the Command Prompt, right click on it and select Run as Administrator.
  • Copy and paste the following into the Command Prompt and press enter.
Code:
reg load HKLM\COMPONENTS C:\WINDOWS\SYSTEM32\CONFIG\COMPONENTS
Right-click on the file FRST64.exe and choose Run as administrator.
  • Copy and paste the following (code) into the Search box and click the Search Registry button.
Code:
KB5021237
  • When the scan is complete, a message will display that SearchReg.txt is saved in the same folder FRST was started from.
  • Post the logfile SearchReg.txt as attachment in your next reply.
 
Start the
577bf0efb8088-FRST.png
Farbar Recovery Scan Tool again.

Warning: This script was written specifically for this system. Do not run this script on another system.
  • Download the attachment fixlist.txt and save it to your desktop.
  • Right-click on FRST.exe and select "Run as administrator".
  • Press the Fix button.
  • If for some reason the tool needs a restart, please make sure you let the system restart normally.
  • When finished, a log called Fixlog.txt will appear in the same directory the tool is run from.
  • Post the logfile Fixlog.txt as attachment in your next reply.

Afterwards, reboot the server and try to upgrade SRV2019 Standard to Datacenter. If it fails attach a new copy of the CBS logs.
 

Attachments

Okay, so after having completed the necessary steps it now looks like this:

Deployment Image Servicing and Management tool
Version: 10.0.17763.3406

Image Version: 10.0.17763.4131

Starting to update components...
Starting to install product key...
Finished installing product key.

Removing package Microsoft-Windows-ServerStandardEdition~31bf3856ad364e35~amd64~~10.0.17763.1
[==========================100.0%==========================]
Finished updating components.

Starting to apply edition-specific settings...

Error: 0x80220008

An error occurred while applying target edition component settings. The upgrade cannot proceed.
For more information, review the log file.


Let's call it a progress :-) I'm sending the logs.
 

Attachments

Open the following directory: "C:\Windows\System32\spp\tokens\skus" which folders are present here? Please provide a screenshot.
 
It's getting a bit strange perhaps - after I received the 0x80220008 error I restarted the system and it now shows as:

1679505443624.png

Here's what the skus folder looks like:

1679505618235.png

Seems like the upgrade was a success this time, isn't it? Dism /Online /Cleanup-Image /ScanHealth shows no errors. :-)
 
Thank you so much for your help! I hope you'll be so kind to help me with a Windows 10 update issue that's been annoying me for a while - I'll be creating a separate thread in a moment.
 
Back
Top